2010-04-29

OpenSceneGraph Installation in Jaunty Jackalope (brief version)

aOpen synaptic package manager (see the System tab at the top, click it, go to Administration/Synaptic Package Manager). Search for "cmake". Check the box for cmake AND cmake-gui just below. Click "Apply" and install them.

Also in synaptic package manager, search for libtiff4-dev. "Apply" and install that. Close synaptic package manager.

Open a terminal and enter:

apt-get build-dep openscenegraph

Go to these sites and download the source files - OpenSceneGraph-2.8.2.zip.
AND OpenSceneGraph-Data-2.8.0.zip
http://www.openscenegraph.org/projects/osg/wiki/Downloads
http://www.openscenegraph.org/projects/osg/wiki/Downloads/SampleDatasets

Unzip each of them into their own separate folders inside the /home/ultramanjones folder (insert your user name unless you are ultramanjones!)

(I renamed the OpenSceneGraph-2.8.2 to simply OpenSceneGraph, just to make things simpler)

In the terminal change directory to OpenSceneGraph
cd OpenSceneGraph
and then enter the following commands:
./configure
make
sudo make install
sudo ldconfig
Expect about 30 minutes to go by after typing make.

Open the CMake GUI. Go to Applications/Programming/CMake. Click Browse Source and open the OpenSceneGraph folder. Copy and paste the full path of the folder into the "where to build the binaries" field. Make sure the following are all checked:
BUILD_DOCUMENTATION
BUILD_OSG_APPLICATIONS
BUILD_OSG_EXAMPLES
BUILD_OSG_PACKAGES
BUILD_OSG_WRAPPERS

OSG_MAINTAINER
OSG_GLU_TESS_CALLBACK_TRIPLEDOT

Click the configure button. (this part is incomplete) There will be lots of red stuff to fix. This part is more complicated. You'll need to go into the synaptic package manager and install all the necessary files, dev files etc. for SDL and WxWidgets. Check if all the right stuff is installed by clicking configure again. The more correct things you add the less red lines there will be when you click configure. When all of the red is gone click the "generate" button.

Go back to the terminal and type "make" inside the OpenSceneGraph folder.

(OPTIONAL technique using ccmake without CMake GUI:
ccmake .
make
sudo make install

sudo ldconfig

The ccmake . command will open up an interface with bright yellow hilights. You can navigate through it using the arrow keys and the "page up"/"page down" keys. Make sure that application and examples are set to "on".

Type "c" on your keyboard to configure. You may want to hit it twice, just for good measure. Then type "g" to ready the build and exit. Move on to the next command above. Expect about 15 minutes to go by after typing make.)

Go to the /etc folder. Just click on Places, Computer and then filesystem to find it. Find a file named ld.so.conf and add this line to it:

/usr/local/lib
This will let OSG know where the libraries reside.

Then go back to the terminal and enter the following:
export PATH={$PATH}:/usr/local/share/OpenSceneGraph/bin

export OSG_FILE_PATH=/home/myaccount/MyData/OpenSceneGraph-Data

osgviewer cow.osg

You now should be looking at a shiny metallic cow! Move her around with the mouse. Woo hoo! You did it!
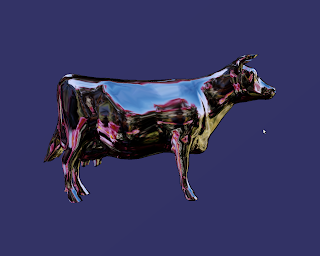


If it's still not working. Find this file CmakeCache.txt inside the OpenSceneGraph folder and find this line: BUILD_OSG_EXAMPLES:BOOL=ON. If it reads "OFF" instead of "ON" then change it and save the file.

For further reference see the links in the post just before this one.
Now direct your browser to http://www.openscenegraph.org/projects/osg/wiki/Support/Tutorials download the tutorials there and get your learn on.

NOTE: you will need to change a line or to in the makefiles that are included with the source code that is included with the tutorials. For instance, in the makefile for the 2nd tutorial line 6:
INCOSG = -I/home/franclin/OpenSceneGraph/include
Change "franclin" to the name of your user folder (ultramanjones for instance).

Also, Nate recommends that you add these three lines to the bottom of the makefile. This will clean up the data after you run the graphics applications:
clean:
rm -f $(EXE) *.o
rm -f *~

Make sure to put a tab before the 2nd and 3rd lines or you'll get a "missing separator" error.

2010-04-10

OpenSceneGraph install instructions for Ubuntu 9.04 Jaunty Jackalope

Note: make sure to update your video card drivers before installing OpenSceneGraph. (my post before this one talks a little about that)

I wrote this blog as I went along, truly keeping a (web) log of my progress. I'm thinking I may write a much shorter summary post later, but maybe not. It's not like its a book or anything.

My instructor posted the following link on his blog. Unfortunately, this didn't seem to be enough to get the job done. At least not with my limited beginner knowledge.

http://nateopengl.blogspot.com/2010/02/easy-open-scene-graph-setup-in-ubuntu.html
So... here are some noob (that's me!) clarifications:

First I opened a terminal and entered this command:

apt-get build-dep openscenegraph

This will install all of the build dependencies needed to run OpenSceneGraph.
I went to this site to download the OpenSceneGraph source files:

http://www.openscenegraph.org/projects/osg/wiki/Downloads

I scrolled down a bit and chose this one OpenSceneGraph-2.8.2.zip .

I unzipped it inside of my /home/ultramanjones folder. I then renamed it simply OpenSceneGraph to keep things simple. ultramanjones is my user name.

Also on the OpenSceneGraph site, I found a copy of OpenSceneGraph-Data-2.8.0. Couldn't seem to find a 2.8.2 version. No worries, it will work. I downloaded that and unzipped into /home/ultramanjones right along side of the OpenSceneGraph folder.

I wasn't quite sure what he was referring to when he wrote:

Then I just downloaded the source code for Open Scene Graph 2.8.2 and compiled it as normal with the ./configure ; make; sudo make install

Then I went back and did the CMake turned on demos and apps and did the make; sudo make install


So I looked in the OpenSceneGraph folder and found a readme.txt. That helped make things a little clearer:

cd OpenSceneGraph
./configure
make
sudo make install

I just needed to get in the terminal and Change Directory to the OpenSceneGraph folder. and then, one at a time, enter the next three commands listed above.

"./configure" will only take a minute to execute. "make" will take a good half hour or so. "sudo make install" will flash by in a couple seconds.

Then he writes this:

Then I went back and did the CMake turned on demos and apps and did the make; sudo make install

Okay... um what? Never heard of CMake. So I googled it. I found this link concerning using CMake with OpenSceneGraph.

http://www.openscenegraph.org/projects/osg/wiki/Build/CMake

(btw I also found out that CMake is already included with Ubuntu 9.04, so no need to install it)

I read it and followed this bit of instruction:
# Assuming we're in the directory where the OSG sources
# are unpacked (usually as the directory "OpenScenGraph")
cd OpenSceneGraph
ccmake .
make
sudo make install
cd ..
After entering "ccmake ." I saw a little window with lots of yellow high-lighting open up - the CMake GUI I presume. I used the arrow keys to select "application" and "examples" and make sure they are set to "on". I used the enter key to change if necessary.

Used the "c" key to configure and then hit "g" to ready the build and exit. I was returned to the command line quickly.

Typed "make" and CMake did its work for the next 15 minutes or so.

Typed "sudo make install" and entered the administrator password when prompted, as usual. Seconds later I was returned to the command prompt.

After this I tried to follow the rest of Nate's instructions from his blog post, the first link at the top of this post, but I could not find an "ld.config.so" file in the /etc system folder. Once again I've hit a wall. I will update when I get this thing complete!!!

...time passes...

Woo hoo!! I finally got it working and saw the glorious cow! I'm still not quite sure what I was doing wrong, but, wouldn't you know it, I found the solution to my problems by returning to the source itself. The OpenSceneGraph site. Go figure. More specifically:

http://www.openscenegraph.org/projects/osg/wiki/Support/GettingStarted

I used the following commands from the "4. Running the example applications" section of the page:

export PATH={$PATH}:/usr/local/share/OpenSceneGraph/bin
export OSG_FILE_PATH=/home/myaccount/MyData/OpenSceneGraph-Data
osgviewer cow.osg
And blammy! I was spinning a shiny metallic cow. I know this is a long post, but I really wanted to make it as accessible to newbies as possible.

NOTE: I never did find that file my instructor was referring to, but I did find one named ld.so.conf and I added the line "/usr/local/lib" to that file. The only other thing in the file is "include /etc/ld.so.conf.d/*.conf" at the top of an otherwise empty file. I didn't think it could hurt anything to add that simple line. AND the good news is that it is working.
Another link that may be of help:

http://osgart.org/wiki/Linux_Setup#2._Open_Scene_Graph_Installation

2010-04-08

getting the OSG installed and built from source on a fresh machine.

This advice is slightly dated, originally intended for 8.10, plus I'm not sure what half of it means, lol. I'm keeping it for reference, mainly because of the part concerning getting the appropriate proprietary driver for the nVidia 8400.

http://forum.openscenegraph.org/viewtopic.php?t=1363

Head to this thread in the OSG Forum and scroll down a few posts for what the poster describes this way:

"Below is the an extract of a script file that I use as a template for
getting the OSG installed and built from source on a fresh machine.
It's written long winded to enable me to add the commentary about what
is being installed to do what. You can put all the packages on to a
single apt-get line. The only line you might need to vary is nvidia
packages - as these only apply to Nvidia cards with the proprietary
drivers. "

Thanks to
Robert Osfield, OSG Forum member, for his helpful post.


This line I could not use:
sudo apt-get install nvidia-glx-177-dev libglu-dev

I instead did a google search and found that nvidia-glx-180 was appropriate for the nVidia geforce 8400 series cards, and I used the Synaptic Package Manager to perform that installation. (A simple search for glx nVidia inside of Synaptic)

This line and some others I will have to look into in the future, when I get deeper into developing with OSG:

# image libs
sudo apt-get install libpng-dev libjpeg-dev libtiff-dev

Compiz Fusion Advanced Display System Activation in Ubuntu 9.04 Jaunty Jackalope


If you want to unleash the elegant and powerful Compiz Fusion and take your desktop into the future, not to mention make it look really pretty...

Just check out this link and follow the instructions!

http://www.futuredesktop.org/compiz_desktop_in_ubuntu9.04.html